
- How is Google Analytics 4 Different from that of Universal Analytics?
- What are the Reasons for Using Google Analytics 4?
- 1. Helps Identify the Traffic Sources:
- 2. Tracks Visitors’ Action on the Site:
- 3. Identifies the People Visiting Your Site:
- 4. Keeps a Tab on Conversions:
- What is the Step-by-Step Approach for Setting Up GA4 for Your Brand Website?
- Step 1: Create Your Analytics Account or Login to Existing One
- Step 2: Create a GA4 Property
- Step 3: Choose Your Data Stream
- Step 4: Get the Tracking Code for Google Tag and Analytics
- Step 5: Install the Google Tag
- Step 6: Check if GA4 is Working Properly with the Tracking Code or Not
- Parting Words
When you are running a website to conduct your business operations or acquire sales, you ought to measure its performance. You need to track the flow of traffic, rate of conversions, and other such metrics to be able to make data-driven decisions in the long run.
And to ensure that, you will need a proper analytics tool in place. Google Analytics 4 or GA4 is one such tool that holds the utmost importance in the data analytics arena for business websites. Upon using this tool, you will be able to track the count of visitors on your site, common traffic sources and sessions.
Now, what’s GA4 and how is it different from the traditional Universal Analytics by Google?
Well, GA4 is the latest upgrade to the measurement tool introduced by Google. It is made with the vision of replacing Universal Analytics with better features and capabilities. The GA4 was launched back in October 2020 and has been adopted immensely by the brands.
As GA4 integrates the ML concept for introducing better reporting and tracking capabilities, site owners are now able to add more proficiency to their performance analysis efforts.
There is a lot for you to learn about this tool before you can actually get along with the setup process. So, this article is here to educate you on GA4 and its attributes, following which you will get an insight into the steps for setting it up.
How is Google Analytics 4 Different from that of Universal Analytics?

For you to know, Google Analytics 4 or GA4 is a robust reporting service that Google develops for gathering statistics on site traffic. Alongside the Google Search Console, GA4 is referred to as the standard analytical service that’s essential for your marketing or SEO practices.
Before you get along with setting up the GA4 for your website tracking, you must understand how it is better than that of Universal Analytics (UA). In simple words, GA4 is an upgraded version of UA but has a completely revamped system with a unique approach to conversion and event tracking.
In the case of UA, the events were tracked based on hit types, such as transactions, page views and others. Upgrading to GA4, such instances were tracked as specific events, which demands you to make some additional configurations for deriving accurate data.
Some of the things that you can do with GA4 that you couldn’t have done with Universal Analytics include:
- Initiating additional analytics parameters for the specific events.
- Modifying the default settings such as reporting identity, to make it suit your business necessities.
- Customization of the reports for displaying data and metrics that are most important to the team.
GA4 is way more complex than most of its prior iterations. Therefore, you will need an in-depth understanding of its capabilities before you get along with setting it up for your business analytics.
What are the Reasons for Using Google Analytics 4?

GA4 is undoubtedly one of the most comprehensive and great tools, but people aren’t able to use it to the maximum potential. And that happens because people are approaching it with the minimum knowledge they have. Therefore, here are some reasons to give you a hint on the capabilities and to convince you why you should use GA4 over UA:
1. Helps Identify the Traffic Sources:
Google Analytics 4 helps you get an insight into the specific ways that the users adopt for visiting your site. Upon using GA4, you will get an insight into the count of visitors coming to your site through the search results, third-party sites, paid ads, social media or other such sources.
2. Tracks Visitors’ Action on the Site:
You will be able to track the pages your visitors access on your site, along with what actions they took on it. Along with that, you will be able to monitor the amount of time your visitors spend on specific pages. In case they bounced off from one or more web pages, you will get that data tracked as well.
3. Identifies the People Visiting Your Site:
Using GA4, you will be able to see the demographics of the visitors, their interests, and geographic location to be able to know your target audience better. Not only that, but you will also be able to determine what browsers or devices they prefer to use for accessing your website.
4. Keeps a Tab on Conversions:
When you are using GA4, you will also be able to track how the visitors are converting into customers on your site. For instance, you will be able to track the number of site visitors who filled out a form, subscribed to newsletter services or purchased something.
The best thing is that GA4 is absolutely free and comes with automated GA4 features. So, even though you are starting with a new website, integrating GA4 allows you to monitor and collect information right after establishing the connection.
What is the Step-by-Step Approach for Setting Up GA4 for Your Brand Website?

Now that you know why GA4 is important for your business website and how it can help you grow in this competitive market, it is time to learn how you can do its setup for your website. Here are the in-depth steps on how to setup GA4:
Step 1: Create Your Analytics Account or Login to Existing One
Visit the Google Marketing Platform, and create a GA4 account. Click on ‘Get Started Today’ to initiate the process. In case you already have the Analytics account, just click on ‘Sign In’ and get in.
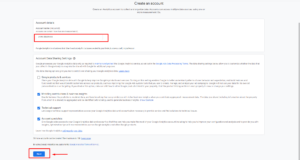
Once you have created or accessed your Analytics account, you must then configure some settings in it. Go to the ‘Admin’ section and find the ‘Create Account’ tab. Click on it, following which you will be prompted to enter a name and configure the data-sharing attributes.
After giving that information, click on ‘Next’, and you will then be moving ahead to create a New Property.
Step 2: Create a GA4 Property
Do you know what the GA4 property is? Well, a GA4 property within your account is the place where all your site information will get processed.
In simple words, creating a GA4 property is of utmost necessity, ideal for GA tracking as well as data collection. You have the liberty to add up to 2000 properties to your account.
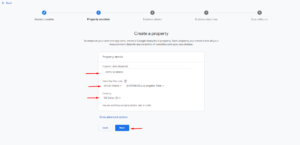
As you are already on the specified page in the last step, you will now be prompted to enter the name of the Property. Following this, you must choose your currency and time zone. Once done, click on ‘Next’, and you will be taken to the next form.
Here, you will have to choose your business niche and its size before moving on to the next form.
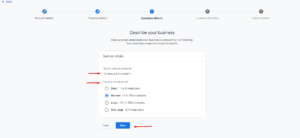
Now, you will be asked to pick an option on how you are planning on using GA4. Whether you want to use it for generating leads, driving online sales, spreading brand awareness, tracking user behavior, or getting reports, you will have to tick one or multiple options on this page.
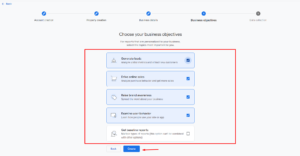
Once you are done with selecting the objectives, go ahead and click on ‘Create’. Just after you do that, a ‘Terms of Service’ dialog box will appear, which you have to accept by ticking the checkbox and clicking on ‘I Accept’.
Step 3: Choose Your Data Stream
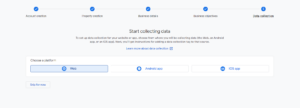
At this stage of setting up GA4, you will have to decide on the data collection sources, such as Android app, iOS app or web. You must click on the platform that seems most relevant to you. Do review all the settings that are asked while you configure the data stream and fill in all the details.
In case you choose the web platform as your source, you must enter the site name and a dedicated stream name to move further. Now, you will also have an enhanced option for adjusting the measurement settings.
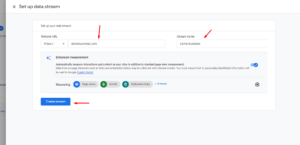
With this feature, you will automatically be able to collect diverse insights on how the users are engaging with your site. Once you are done with the configurations, go ahead and click on the ‘Create Stream’ tab.
Step 4: Get the Tracking Code for Google Tag and Analytics
Once the data stream is up and ready, you will receive your Google Tag. You are supposed to install this Tag on your website. To access the Google Tag, you will have to go to the Admin Panel and find the ‘Install Your Google Tag’ option.
To do this, you must first choose the relevant ‘Account’ as well as ‘Property’, as specified in the prior steps. Now, go to the ‘Data Streams’ and pick the one you just created for the website.
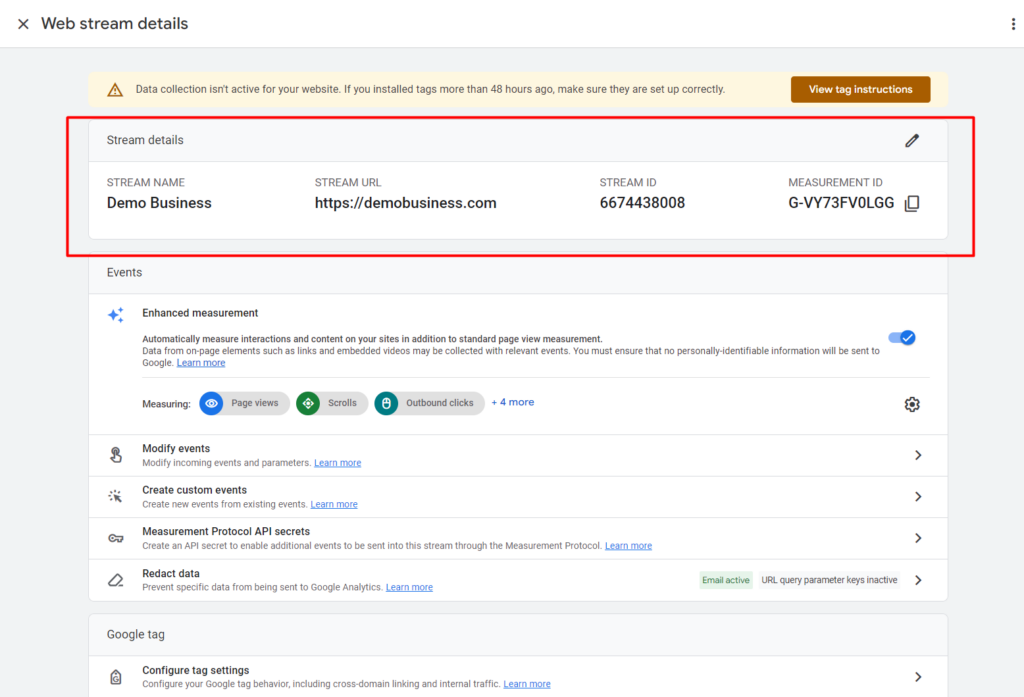
Now, you will be taken to a new window where you will be able to see the GA4 tracking code or measurement ID. Click on ‘View tag instructions’ to expand the GA4 tag. Now, you will be able to see as well as copy the tracking code.
Step 5: Install the Google Tag
Now, you must add that GA4 tag you retrieved to every page of your site that you want to set up for data collection. You can use Google Tag Manager to approach this process manually or by using a dedicated plugin meant for your CMS.
Manual Process:
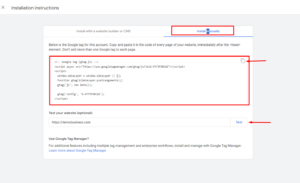
When doing it manually, you must copy the tracking code from the given installation instructions and paste it right after the ‘<head>’ element of every page. Keep in mind that you have to add only one tracking code for every page.
Using Google Tag Manager:
You can also approach the process of adding a Google tag to the site by using Google Tag Manager. For using this approach, you must create an account on Tag Manager, and complete the basic formalities.
After that, click on ‘Create’ and go to ‘Add a New Tag’ in the ‘Overview’ section. Add the title of the Tag, and click on ‘Configuration’.
You will now be asked to choose the type of configuration you are seeking, and you have to click on ‘Google Analytics: GA4 Configuration’. Now, enter the measurement ID, which you will be able to find in the ‘Web Stream Details’ section.
Now, you must create the trigger for loading the GA4. For that, click on ‘Triggering’ and choose ‘Initalization– All Pages’. This setting will enable the GA4 tag to fire up before all the other triggers. Once done, save all the settings or changes.
Using Plugin or CMS:
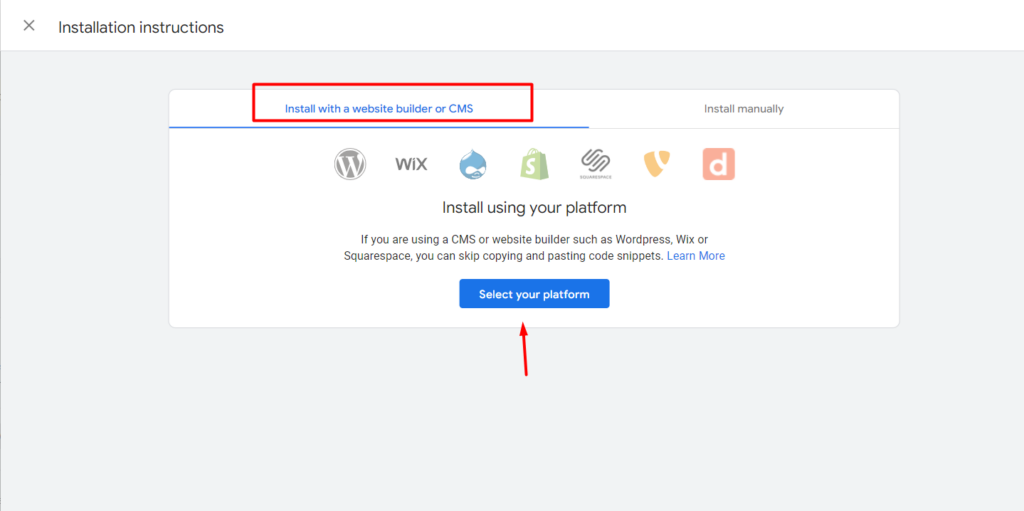
To install the Google Tag through this method, you will click on the given option Install with a Website Builder or CMS right on the installation instructions page. Now, you will be asked to enter the site URL and will be recommended to choose one of the supported platforms.
Now, you will have to integrate the plugin and then connect your CMS with the GA account. With this, you will now be able to authenticate the Google Account.
Step 6: Check if GA4 is Working Properly with the Tracking Code or Not
Once the setup is complete, you must then head to the ‘Admin’ panel and click on your select Property. Now, go to Realtime > Overview.
You will now be shown a report that will give you an update on the current status of your site. If the tracking code installation is done right, you will definitely see some form of site activity in real time.
But remember, data processing followed by the installation of tracking code might take around 24-48 hours for completion.
Parting Words
With these detailed steps, you might now have a deep understanding of how to set up Google Analytics 4 for your business website. Upon successful integration and proper data assessment, you will realize how great of a tool it is.
With the right strategic use, you will be able to derive a lot of valuable and conversion-worthy data statistics about the site. You can also consider pairing your GA4 with Search Console, SE Ranking and other such services, allowing you to derive more in-depth metrics.
As you know, GA4 is absolutely free and is a completely automated tool that you can integrate with your CMS or diverse services. In case you find any kind of complexity while setting up GA4, you can always take the help of a GA4 setup assistant or an expert in the domain.
There is a lot of potential hidden in the depth of GA4! And if you are all installed and ready with it, soon you will be leveraging the maximum capabilities of this site performance tracking solution.