Magento 2 Advanced Reports view notification extension gives you the best report system for sending data directly to the admin. It is easier to get your report daily, weekly, or monthly.
Elsner Tech Advance Report View Notification Extension is a flexible and user-friendly analytics extension. It gives you an email notification to improve upon default Magento reports in every possible way.
The Problem of the Current Scenario:
When the Admin or owner wants to check the daily report or monthly report then they need to log into the Magento admin and on the dashboard and apply the filter. That is a very time-consuming process for every user. You can’t analyze all the data when you need like for a specific period. Also, you need to do a filter in the Magento dashboard every time the specific data.
Solution: Magento 2 Advanced Report View notification extension gives you the solution for the above problems. You don’t need to log in every time the check your report daily. You can send an email to any person in a specific time duration. It is like your daily analysis report will be in your hand.

Deep Analytics
In this extension, You don’t need to go to Magento admin to view your report. For that, you just set in the extension that it will automatically send you the report in your remain in a specific period like daily, monthly, every 15 days, or every month.
For that just check the steps to enable this extension, you just need to enable this extension by the backend admin -> store -> setting -> configuration -> Elsnertech -> Advance Report view.
Please check the screenshot for the admin setting panel.

You need to enter the serial key here. And you will get it from the Elsner team. For that, you need to contact the Elsner team and you need to give your domain name without a subdomain, HTTPS, or HTTP.
After that Elsner team will provide you with the Serial key according to your domain. You need to add that serial key to the serial key text box and then just click on the save button.
Then you will see the Elsner icon in the left-hand side menu. Then Click on the Schedule Advance Report Notification. Please check the screenshot

After that, the table will be open

Here you can see there is a grid of the data which is the schedule by the admin if any. You can also schedule the email by clicking on the add new Row.
Click on the Add New Row and open the form

Here you can see the Status of the current schedule report. To enable the email template you need to make it enabled otherwise, it will not send an email to the recipient’s email address.
Title: This is the title that will appear in the email top of the page. If you set the title to “30 days report” then the title will show on the top of the email in the big font.
Subject: this is the subject field that will appear when an email comes. That means this is the subject of the email. And this is the required field.
Recipient: Here you need to enter the email to which you want to send the email address. And this can be multiple email addresses but for that, you need to create a new row.
Schedule: In this field, you need to select the time duration for the email. You have only four options here. From this option, you can select your required time duration.
It is like 24 hours, 7 days, 15 days, 30 days
All the schedule for the email time is below.
24 Hours: When you set up 24 hours then the Schedule email will be sent every 24 hours. That means the whole data like the customer or order which is generated in 24 hours will be sent in an email to the Recipient’s email address.

7 Days: When it is set to 7 days then data is sent to the recipient’s email address of the last seven days. It’s the weekly report. And it will be sent in every week.

15 Days: When it’s set to 15 days then the last fifteen days data is sent to the recipient’s email address. And it will be sent every fifteen days.

30 Days: In the last, when it’s set to 30 days then the last thirty days data will be sent to the recipient address. Also, it will be sent every thirty days.

Then after filling in all the details you just need to save it.
After that, you will get the email based on the time duration that you will get the report.
Please check the output for the same that you will get in your email.
The data that you will get in the email are:
Order: Here You can see the total order number and how many orders have been created in the past specific time duration. For example, 5 orders were created in the last 24 hours.
Revenue: In this field, you can see the total revenue from the orders that the store owner will get.
Tax Collected: In this field, You will find the total number of taxes collected from the order. Like the total order amount is 110$ but the tax amount 10$ from 110$.
Shipping Collected: In this field, You will find the total number of shipping collected from the order. Like the total order amount is 110$ but the shipping amount of the order is 10$ from 110$.
AOV: AOV stands for Average Order Value. This field shows the Average order value.
It will show all the order amount average values. For example, there are 5 orders created in the last 25 hours and the total revenue generated from this order is 100$. So the simple average formula for generating AOV is the total revenue of the order divided by the number of orders and it will show the Average order value. So as per the formula 100/5 = 20$. 20$ is the Average order value as per the order revenue and number of orders.
Order By Status: In the department, You will see the total number of orders that will be created based on the order status. Like how many pending, completed, or processing orders are created in the last 24 hours, 7 days, 15 days, or 30 days
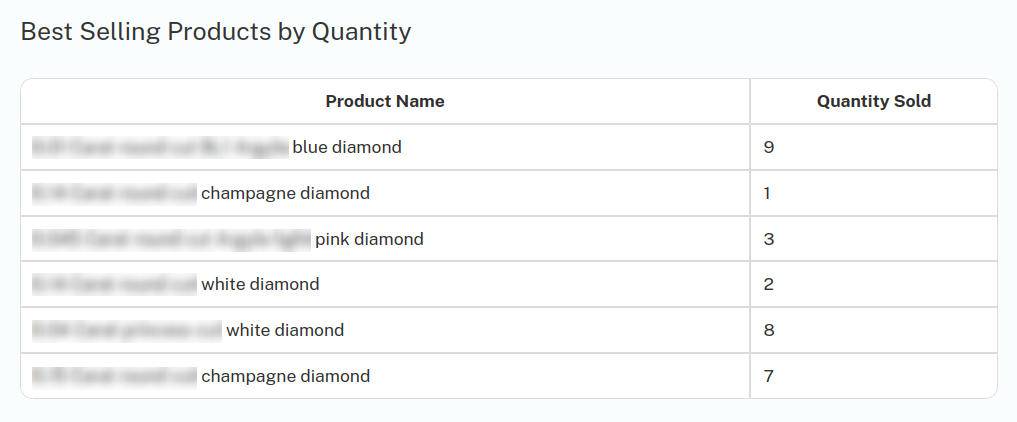
Quantity Of Product Sold: In this field, it will show the total number of product quantities sold in order will be created in the last 24 hours. 24 hours is the example which will be based on the schedule that you have created.
New Registered Account: In this field, it will show the number of customers that have been registered in the last 24 hours.
Advance Sales Report Graphs (Live Examples)


Advance Product Report Graphs (Live Example)
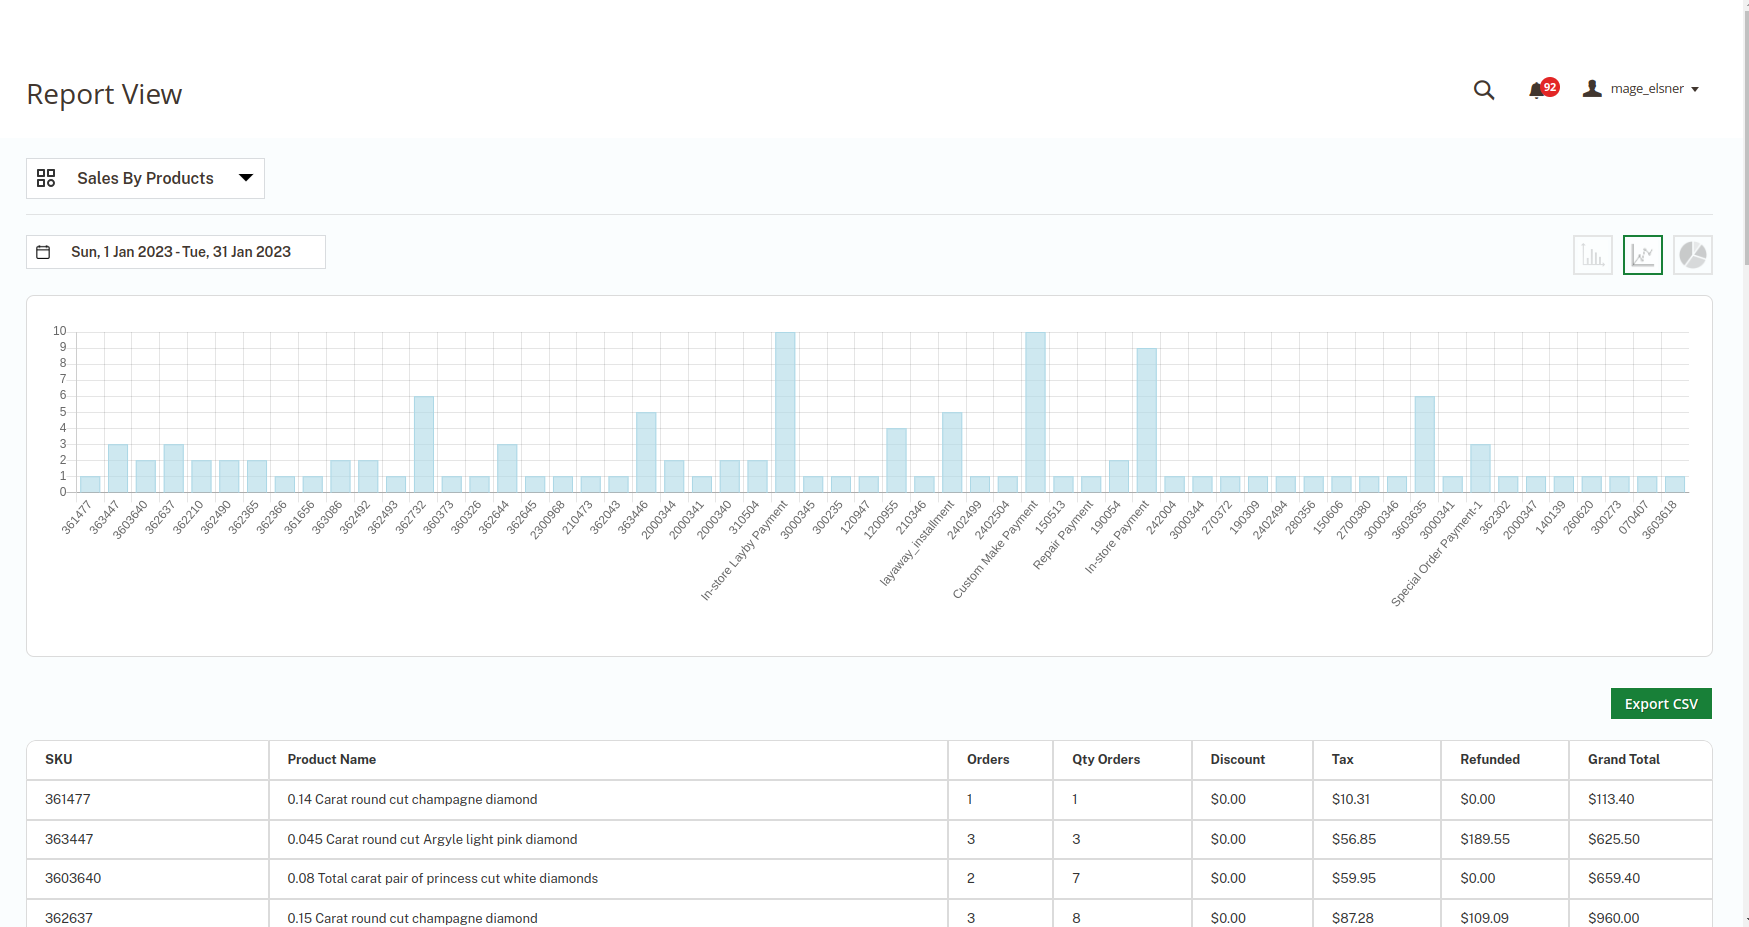
So this extension will help you to get this kind of report based on time duration.
Check With Our Existing Jewelry Project Reports:


This is the extended functionality that the Advance Report view Notification extension gives you for the easier your daily checking life. You will get all the details daily or whenever you want it by hand in email. So you don’t need to check by logging in admin and by filtering every time duration.
So this is how the extension will work on your Magento 2 environment and this extension is supported with the latest Magento version also. You just need to install it and add the serial key.