Flavors are a very important thing for us when we have different types of user roles and environments like dev stage and production. One kind of environment is flavor. We have distinct environments for development, staging, and production while working on live projects. At that time we can use this thing in our project. After use of flavors in our project many things will become easy.
Flutter flavors provide you with an easy way to manage various app configurations, enabling you to make specific builds for development, staging, and production environments, as well as for target users.
How can we implement it with our flutter project:
We have done different configurations for Android and iOS.
How To Implement the Flutter Flavors in Android:
First, we will create environment.dart file and put all environment-related configuration in this file.Here is my code of environment.dart:
enum Environment {
adminDev,
adminStage,
adminProd,
userDev,
userStage,
userProd
}
enum UR {
admin,
user
}
class Constants {
static Map<String, dynamic>? config;
static UR? ur;
static void setEnvironment(Environment env) {
switch (env) {
case Environment.adminDev:
config = Config.adminDevConstants;
ur = UR.admin;
break;
case Environment.adminStage:
config = Config.adminStgConstants;
ur = UR.admin;
break;
case Environment.adminProd:
config = Config.adminProdConstants;
ur = UR.admin;
break;
case Environment.userDev:
config = Config.userDevConstants;
ur = UR.user;
break;
case Environment.userStage:
config = Config.userStgConstants;
ur = UR.user;
break;
case Environment.userProd:
config = Config.userProdConstants;
ur = UR.user;
break;
}
}
static get serverOne {
return config![Config.serverOne];
}
static get serverTwo {
return config![Config.serverTwo];
}
static get whereAmI {
return config![Config.whereAmI];
}
static get whoAmI {
return ur;
}
static get accessToken {
return config![Config.accessToken];
}
static get appId {
return config![Config.appId];
}
static get appEndPoint {
return config![Config.appEndPoint];
}
}
class Config {
static const serverOne = “SERVER_ONE”;
static const serverTwo = “SERVER_TWO”;
static const whereAmI = “WHERE_AM_I”;
static const whoAmI = “WHO_AM_I”;
static const accessToken = “TOKEN”;
static const appId = “APP_ID”;
static const appEndPoint = “END_POINT”;
static Map<String, dynamic> userDevConstants = {
serverOne: “”,
serverTwo: “”,
whoAmI: “user”,
whereAmI: “development”,
accessToken: “”,
appId: “”,
appEndPoint: “”
};
static Map<String, dynamic> userStgConstants = {
serverOne: “”,
serverTwo: “”,
whoAmI: “user”,
whereAmI: “staging”,
accessToken: “”,
appId: “”,
appEndPoint: “”
};
static Map<String, dynamic> userProdConstants = {
serverOne: “”,
serverTwo: “”,
whoAmI: “user”,
whereAmI: “production”,
accessToken: “”,
appId: “”,
appEndPoint: “”
};
static Map<String, dynamic> adminDevConstants = {
serverOne: “”,
serverTwo: “”,
whoAmI: “admin”,
whereAmI: “development”,
accessToken: “”,
appId: “”,
appEndPoint: “”
};
static Map<String, dynamic> adminStgConstants = {
serverOne: “”,
serverTwo: “”,
whoAmI: “admin”,
whereAmI: “staging”,
accessToken: “”,
appId: “”,
appEndPoint: “”
};
static Map<String, dynamic> adminProdConstants = {
serverOne: “”,
serverTwo: “”,
whoAmI: “admin”,
whereAmI: “production”,
accessToken: “”,
appId: “”,
appEndPoint: “”
};
}
We need to define it in build.gradle(app level) also,
flavorDimensions “app”
productFlavors {
adminDevelopment {
dimension “app”
applicationId “com.example.admin.dev”
versionCode flutterVersionCode.toInteger()
versionName flutterVersionName
copy {
from ‘src/adminDevelopment/’
include ‘*.json’
into ‘.’
}
resValue “string”, “app_name”, “”
}
adminStage {
dimension “app”
applicationId “com.example.admin.stg”
versionCode flutterVersionCode.toInteger()
versionName flutterVersionName
copy {
from ‘src/adminStage/’
include ‘*.json’
into ‘.’
}
resValue “string”, “app_name”, “”
}
adminProduction {
dimension “app”
applicationId “com.example.admin.prod”
versionCode flutterVersionCode.toInteger()
versionName flutterVersionName
copy {
from ‘src/adminProduction/’
include ‘*.json’
into ‘.’
}
resValue “string”, “app_name”, “”
}
userDevelopment {
dimension “app”
applicationId “com.example.user.dev”
versionCode flutterVersionCode.toInteger()
versionName flutterVersionName
copy {
from ‘src/userDevelopment/’
include ‘*.json’
into ‘.’
}
resValue “string”, “app_name”, “”
}
userStage {
dimension “app”
applicationId “com.example.user.stg”
versionCode flutterVersionCode.toInteger()
versionName flutterVersionName
copy {
from ‘src/userStage/’
include ‘*.json’
into ‘.’
}
resValue “string”, “app_name”, “”
}
userProduction {
dimension “app”
applicationId “com.example.user.prod”
versionCode flutterVersionCode.toInteger()
versionName flutterVersionName
copy {
from ‘src/userProduction/’
include ‘*.json’
into ‘.’
}
resValue “string”, “app_name”, “”
}
}
Okay now we are going to create different main.dart files for different flavors. So create all files in lib and write code for set environment.
main_admin_development.dart
void main() async {
WidgetsFlutterBinding.ensureInitialized();
Constants.setEnvironment(Environment.adminDev);
runApp(const DemoScreen());
}
main_admin_stage.dart
void main() async {
WidgetsFlutterBinding.ensureInitialized();
Constants.setEnvironment(Environment.adminStage);
runApp(const DemoScreen());
}
main_admin_production.dart
void main() async {
WidgetsFlutterBinding.ensureInitialized();
Constants.setEnvironment(Environment.adminProd);
runApp(const DemoScreen());
}
main_user_development.dart
void main() async {
WidgetsFlutterBinding.ensureInitialized();
Constants.setEnvironment(Environment.userDev);
runApp(const DemoScreen());
}
main_user_stage.dart
void main() async {
WidgetsFlutterBinding.ensureInitialized();
Constants.setEnvironment(Environment.userStage);
runApp(const DemoScreen());
}
main_user_production.dart
void main() async {
WidgetsFlutterBinding.ensureInitialized();
Constants.setEnvironment(Environment.userProd);
runApp(const DemoScreen());
}
Now we we will go for demo screen which I have put in all main.dart.
My demo screen code handles both user role and environment checks. This allows me to conditionally display features based on requirements, such as showing specific buttons only in the admin app or tailoring content based on the development, staging, or production environment.
demo_screen.dart
import ‘package:flutter/material.dart’;
import ‘environment.dart’;
class DemoScreen extends StatefulWidget {
const DemoScreen({super.key});
@override
State<DemoScreen> createState() => _DemoScreenState();
}
class _DemoScreenState extends State<DemoScreen> {
String? userRole;
String? environment;
@override
void initState() {
// TODO: implement initState
super.initState();
environment = ‘${Constants.whereAmI}’;
userRole = (Constants.whoAmI == UR.admin) ? ‘admin’ : ‘user’;
}
@override
Widget build(BuildContext context) {
return MaterialApp(
title: ‘My App’,
debugShowCheckedModeBanner: false,
home: Scaffold(
body: Center(
child: Text(
“I am in $environment environment with $userRole role”,
style: const TextStyle(fontSize: 20),
),
),
),
);
}
}
Now If you want to set different logos for different flavor and also different app name to different flavor you can follow these steps:
For that, we have to create different folders for different flavors in src/app/android(as shown in the above image).
To change logo, You have to add all mipmap folders in res folder.
If you don’t have an idea about how to make mipmap folders of your icon then you can create one from this link: https://www.appicon.co/
You have to do the same process for all flavors to change the all flavors app logo.
And If you want to change name
Create strings.xml file in values as shown in the above image.
And code of that file is
<?xml version=”1.0″ encoding=”utf-8″?>
<resources>
<string name=”app_name”>Admin Development</string>
</resources>
You have to do same process for all flavors to change all flavors app name.
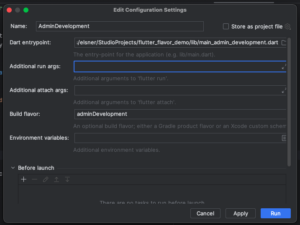
All set for flavors. Now you can run for different flavors and check. But you will ask question how to run for different flavor. So let me explain you that.
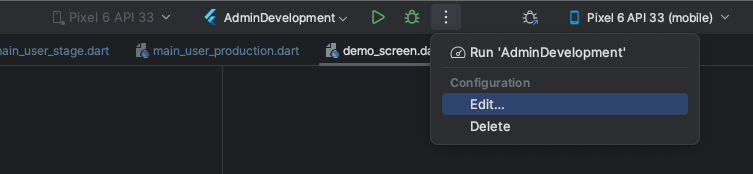
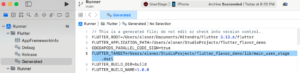
As shown in image click on three dots icon beside the debug icon and then click on Edit. After click on Edit you will see like this
Now you have to modify Data entrypoint(see above image) and Add flavor in Build flavor whichever flavor you want to run.
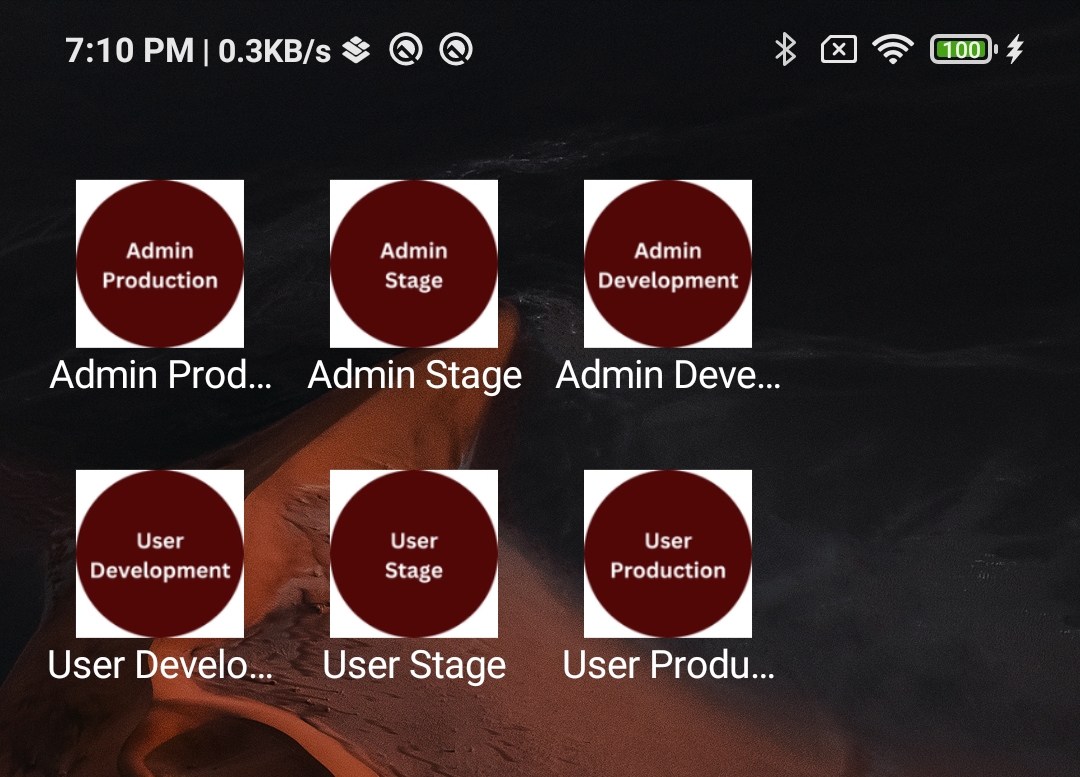
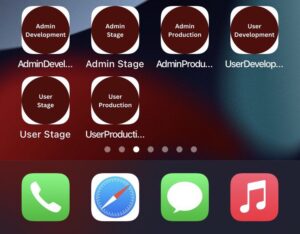
After that I have made builds for all flavors and you can see it.
Now you have to modify Data entrypoint(see above image) and Add flavor in Build flavor whichever flavor you want to run.
After that I made builds for all flavors and you can see it.
How To Implement the Flutter Flavors in iOS:
We need to add flavors first. So for that, we have to create different schemes for different flavors.
Open your ios folder in Xcode and then press on Runner -> Manage schemes.
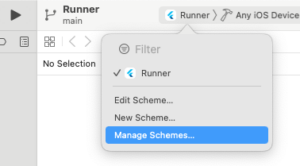
Now follow the next steps:
- click on Runner scheme.
- go to the “…” icon, next to the “+” and “-” icons in the bottom left corner, click on “…” and press Duplicate.
- Rename the new scheme.
- Also change Runner with any flavor.In my case, I have changed it to AdminDevelopment.(see my project’s schemes in below image)

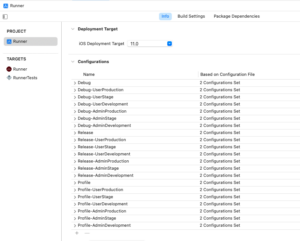
For next configuration, Go to Project level Runner -> Info Tab -> Configurations. In order to support the new Schemas that we created, we need a Debug, Release and Profile configuration for each Schema.
Click on “+” Icon under configuration -> “Duplicate Debug Configuration” and rename it Debug-dev .We need to do this for all Schemas and configuration.
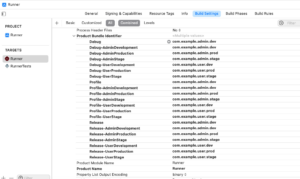
After that we will set different Product Bundle Identifier for each Flavor.
In order to do this we need to edit the property. Go to Runner under Targets -> Build Settings -> Packaging -> Product Bundle Identifier. Expand the property and set bundle Identifier for each flavor.(See below image)
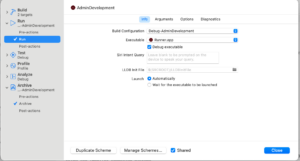
Before run, one small thing which we have to do is set build configuration for each flavor.
For that just select any scheme then go for Edit scheme. After clicking Edit scheme you will show one pop up and In left side of this pop up, there are many points like build, Run, Test, Profile, Analyze, Archive.
In Run and Archive, we have to set Build configuration as shown in below image :
Now let’s see the process of changing the app name and app icon,
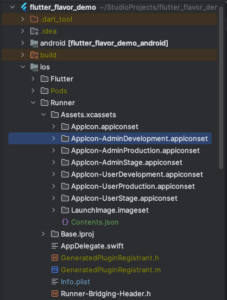
To change app icon, Firstly you have to generate app icons from this site : https://www.appicon.co/
Then go to Android studio and paste that folder in Assets.xcassets and Just renamed it as shown in below screenshot.
Do the same process for all flavors.
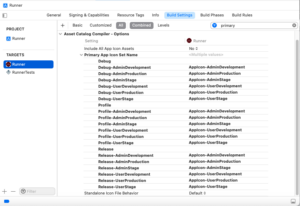
Then go to build settings of Runner(Targets) and search primary, And change icon name values for all flavors as shown in below image.
To change name please follow below steps:
Go to Build Settings of runner(Targets) and add APP_DISPLAY_Name in User-Defined as shown in below image. And give app name in values field.
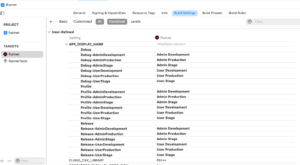
After adding values, you need to change Bundle display name like this ${APP_DISPLAY_NAME}.
![]()
And it’s finished!
Just uninstall all previous apps and re-run with newer changes.
To run, You need to select a particular scheme and give path of that flavor’s main.dart in Generated.xcconfig.
For example If I want to run userStage then I will select UserStage scheme and also give main_user_stage.dart file path in FLUTTER_TARGET.
After that I have made builds for all flavors and you can see it.
Advantages:
- By putting environment-specific configurations in different folders, flavors help you maintain the organization of your code.For larger projects in particular, this makes your code cleaner and more navigable.
- Flavors allow you to define variations inside a single project rather than having to maintain separate codebases for each configuration.Code duplication is decreased and time is saved as a result.
- With just one configuration change, flavors make it simple to move between environments.As a result, the testing and Flutter app development processes are streamlined.
- It is possible to design builds especially for various uses, like feature-limited beta testing or functionally limited demo versions.
- By changing the content, features, or branding components of the app, flavors can assist you in tailoring the experience for users based on their region or demographic.
Disadvantages:
- Adding flavors can make your project setup more complicated, particularly for inexperienced users.It takes more work to comprehend and control various flavor configurations.
- When working with multiple variants, switching between flavors can occasionally result in longer build times or slower IDE performance.
- It can get harder to keep consistency and prevent code duplication amongst flavors as the number of flavors increases.
- It is necessary to think about testing every flavor independently, which could add to your testing burden.
- Not every app development configuration can benefit from flavors. Different approaches may be necessary in complex scenarios with significant feature or code differences.
Conclusion:
If we have a big project which has two or more user roles and different environments then we can go for it. For small projects which has single user role and also don’t have different environments then we don’t need it in such projects.